3.0. Accounting Group Posting Setup
Managing Accounting Group Posting
Understanding Business Partners and Customer Group
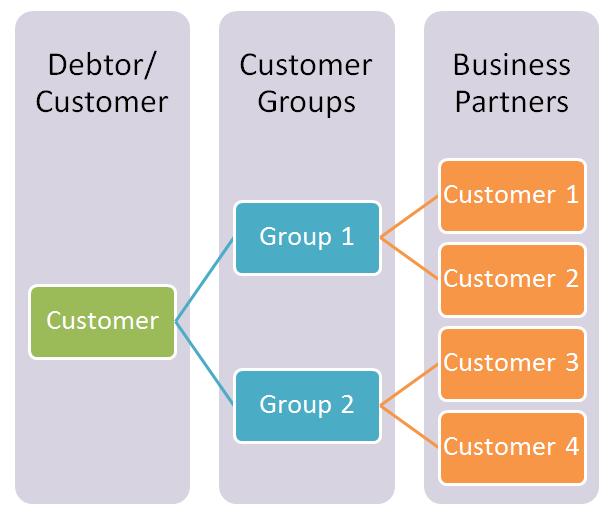
Customer Groups
Customer Groups define the double-entry accounts for posting when there are transactions with the Business Partners under this group.You may setup as many Groups as you like.Note that similar concept applies to Vendor Group too.
Business Partners
As you have learned in basic training, Business Partner is where you enter the Customer/Vendor details.You can also set which Customer/Vendor Group it is classified under.Note that a Business Partner can be classified only under one Customer Group and one Vendor Group
To do this we have to setup
the following:
Chart of AccountCustomer GroupBusiness Partners
Posting Different Income Account for Different Customer
Setting up Chart of Accounts
STEPS:
- Click SETUP activity
- Click ACCOUNT
- Click CHART OF ACCOUNT module
- Filter INC
- Click SEARCH
- Select INC0001
- Click EDIT
- DESCRIPTION rename to Service Sales
- Click UPDATE
- Select INC0002
- Click EDIT
- DESCRIPTION rename to Maintenance Sales
- Click UPDATE
- Select INC0002
- Click DUPLICATE
- Rename DESCRIPTION to Product Sales
- Click ADD
- Close Module
Setting up Customer Groups
STEPS:
- Click SETUP activity
- Click CUSTOMER/VENDOR
- Click CUSTOMER GROUP module
- Click on Customer
- Click DUPLICATE
- GROUP NAME enter SVC-GRP
- To set the account for your INVOICE CR A/C, select INC0001 Service Sales
- To set the account for your DEBIT NOTE CR A/C, select INC0001 Service Sales
- To set the account for your CREDIT NOTE DR A/C, select INC0001 Service Sales in the middle-left of the screen.
- Click ADD
- Click DUPLICATE
- GROUP NAME enter MAINT-GRP
- To set the account for your INVOICE CR A/C, select INC0002 Maintenance Sales
- To set the account for your DEBIT NOTE CR A/C, select INC0002 Maintenance Sales
- To set the account for your CREDIT NOTE DR A/C, select INC0002 Maintenance Sales in the middle-left of the screen.
- Click ADD
- Close Module
Now we create Business Partner and define which group they are below
STEPS:
- Click SETUP activity
- Click CUSTOMER/VENDOR
- Click BUSINESS PARTNER module
- Click NEW
- BP CODE enter SCPL
- NAME enter Service Customer Pte Ltd
- In the middle-left of the screen under Customer, select SVC-GRP as your CUSTOMER GROUP
- Click ADD
- Click NEW
- BP CODE enter MCPL
- NAME enter Maintenance Customer Pte Ltd
- CUSTOMER GROUP select MAINT-GRP
- Click ADD
- Close Module
To facilitate issuing of invoice, we create an item.
STEPS:
-
Click SETUP activity
-
Click ITEM DETAILS
-
Click ITEM module
-
Click NEW
-
CODE enter GSVC
-
GROUP select Service Group
-
DESCRIPTION enter General Service
-
Click ADD
-
Close module
Now we are ready to issue invoices.
STEPS:
-
Click SALES activity
-
Click INVOICE module
-
Click NEW
-
In the top-left of the screen below Date, CUSTOMER select Service Customer Pte Ltd
-
In the middle-left of the screen, ITEM select General Service
-
In the middle of the screen to the right of your Item, under QTY enter 1
-
In the middle of the screen to the right of your Qty, under UNIT PRICE enter 500
-
Click ADD
STEPS:
-
Click EDIT on the newly created invoice
-
Click GL
-
Close GL module
You can see that in the middle of the screen, the $500 Sales is posted to INC0001 Service Sales Account as set in the Business Partner Group
STEPS:
-
Click NEW
-
In the top-left of the screen below Date, CUSTOMER select Maintenance Customer Pte Ltd
-
In the middle-left of the screen, under ITEM select General Service
-
In the middle of the screen to the right of your Item, under QTY enter 1
-
In the middle of the screen to the right of your Qty, under UNIT PRICE enter 800
-
Click ADD
STEPS:
-
Click EDIT on the newly created invoice
-
Click GL
-
Close GL module
You can see that in the middle of the screen, this 2nd invoice Sales is posted INC0002 Maintenance Sales Account instead.
Understanding Item and Item Group
Item Groups
As mentioned in the basic training, Item Groups define if the item is a Service or Inventory item.On top of that, Item Group can also be used to set double-entry accounts for posting on the list of items under this group.However, to achieve this means you must overwrite the setting dictated by the Customer/Vendor Group.An illustration and explanation on this will be shown later. You may setup as many Item Groups as you like.
Items
As you have learned in basic training, Item is where you enter the details of the items.Additionally, you can also set which Item Group it is classified under.Note that an Item can be classified only under one Item Group.
Posting Specific Item to Specific Income Accounts
STEPS:
-
Click SETUP activity
-
Click ITEM DETAILS
-
Click ITEM GROUP module
-
Click DUPLICATE
-
CODE enter PG
-
DESCRIPTION enter Pdt Group
-
PRIORITY (OVERWRITE BUSINESS PARTNER GROUP A/C) Tick
-
You have to tick on Priority. This will Overwrite the Business Partners (which belongs to a Customer Group) pre-set double entries posting accounts.
-
INVOICE CREDIT A/C select Product Sales
-
Select the Account which you want this item to overwrite.
-
CHANGEABLE A/C AT DOCUMENT Un-Tick
-
If you tick on this setting, you will be allowed to choose which account to post to during issuing of the document.
-
Click ADD
-
Close Module
STEPS:
-
Click SETUP activity
-
Click ITEM DETAILS
-
Click ITEM module
-
Click NEW
-
CODE enter PDT
-
In the top-middle of the screen below Item Code, GROUP select Pdt Group
-
DESCRIPTION enter Hardware Sales
-
Once an item is set to the Pdt Group, it is subjected to the Overwriting Double entries Posting set in the Item Group.
-
Click ADD
-
Close Module
Now we are ready to issue an invoice.
STEPS:
-
Click SALES activity
-
Click INVOICE module
-
Click NEW
-
In the top-left of the screen below Date, CUSTOMER select Service Customer Pte Ltd
-
In the middle-left of the screen, under ITEM select General Service
-
In the middle of the screen to the right of your Item, under QTY enter 1
-
In the middle of the screen to the right of your Qty, under UNIT PRICE enter 330
-
In the middle-left of the screen, under ITEM select Hardware Sales
-
In the middle of the screen to the right of your Hardware Sales Item, under QTY enter 1
-
In the middle of the screen to the right of your Qty, under UNIT PRICE enter 990
-
Click ADD
STEPS:
-
Click EDIT on the newly created invoice
-
Click GL
-
You can see that this 3nd invoice in the middle of the screen, there are two Sales posting. $330 is posted to Service Sales Account, which is determined by the Customer Group.
-
While $990 is posted to Product Sales Account which is determined by Item Group which we have set to overwrite the Business Partner Settings.
-
Close GL module
Related Articles
Business Partner Setup
The Business Partner Registration module is where the company's Business Partners (and their details) should be registered. "Business Partners" is a term which encompasses companies who have either of these relationships with your company: as a ...5.0. Setting Bank, Mode & Business Partner in Foreign Multi Currency
Creating a Bank Account in Foreign Multi Currency STEPS: Click SETUP activity Click ACCOUNTS Click CHART OF ACCOUNT module Select Bank 2 Click EDIT DESCRIPTION rename Bank USD CURRENCY select USD BANK INITIAL enter CITI REMARK enter 123-45678-9 Click ...Changing my Item's default posting
When you need an item to post to a specific account you can create up an item group to specify the posting. In the following example, i want to post to rental account whenever i choose the rental account. Under Setup -> Item details -> Item Group ...2.0. Item Group, Items, Warehouse And Location Code
What Is Item Group? Item Group - Controls which General Ledger Account the double- entries are posted to. Item - Records the description of the Stock item, and set which Item Group it belongs to. Renaming Existing Item Group STEPS: Go to Setup > Item ...Delete Business Partner
To remove a Business Partner registration that was just created and have not been used for any entries or setup, simply use the "Delete" button at Business Partner Registration module. Note: The loading time for deleting a Business Partner ...