BatchPay User Guide
Bank Setup

STEPS:
- Click on '+' Button > 'BANK SETUP'
- Fill in details accordingly.
Bank ID (alias): Internal identification, you may simply use the bank name (i.e. UOB)
Bank: Select from dropdown list.
Bank Account No.: As per your bank account. (Exclude - or space)
Bank Account Name: As per your bank account.
Currency: As per your currency.
Chart of Account for Import: As per your SAM system database.*
*Most important field, note that it is directly linked to your GL. - Click on 'SAVE'.
Payee List
STEPS:
- Click on 'PAYEE LIST'
a. If Importing from SAM system: Click on 'SYNC' > 'LOAD' > Select Payees you wish to import > 'IMPORT'.
- Click on the 'EDIT' button, ensure that Default Payment is set up.
b. If starting afresh and not importing, Click on the '+' button, and fill in payee and payment details accordingly.
PAYEE DETAILS:
BP Code: As per SAM System
Payee: Company Name
Contact Name: Internal Identification
Email: As per.
PAYMENT DETAILS:
- Select Default Payment Mode (Paynow/Bank Transfer)
a. PAYNOW: To fill in either Mobile Number, or UEN.
(Select either to be Default Selection)
OR
b. BANK TRANSFER: To fill in
Bank Name: To Select from Dropdown function.
BIC (Bank Identifier Code): According to Bank Selected, this should be filled in by System.
Bank Account Number: As per vendor details.
Bank Account Name: As per vendor details. - Click 'SAVE'.
Payment Records (Things to note)
Prior to importing your Payment Records, it is important to take note of these few pointers: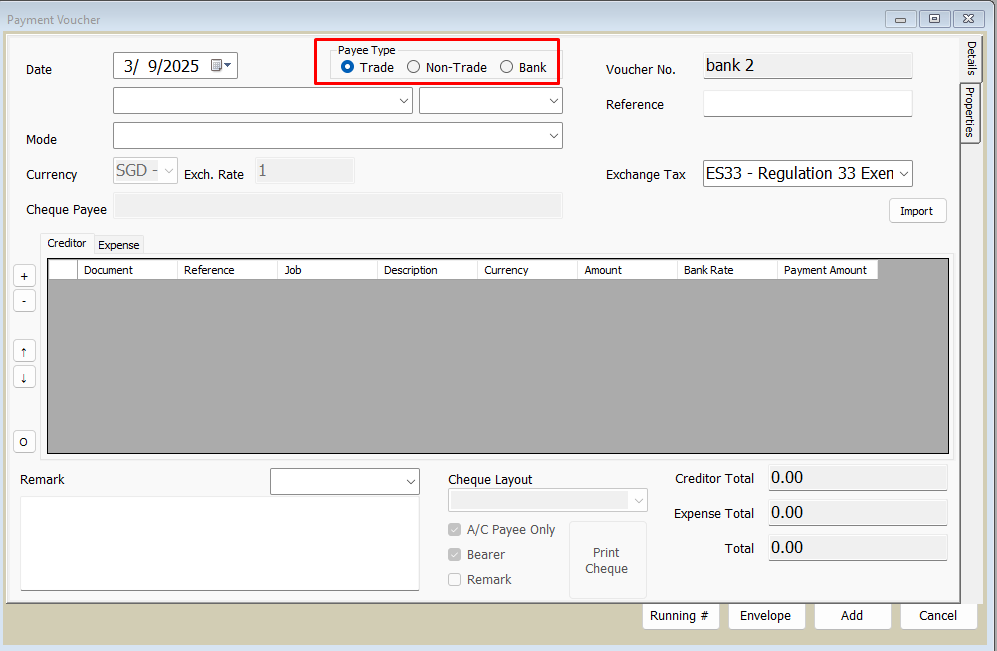
1. PAYEE TYPE MUST BE TOGGLED TO 'TRADE'.
For smooth importing of entries into Batchpay, your payments should all be toggled to 'Trade'.
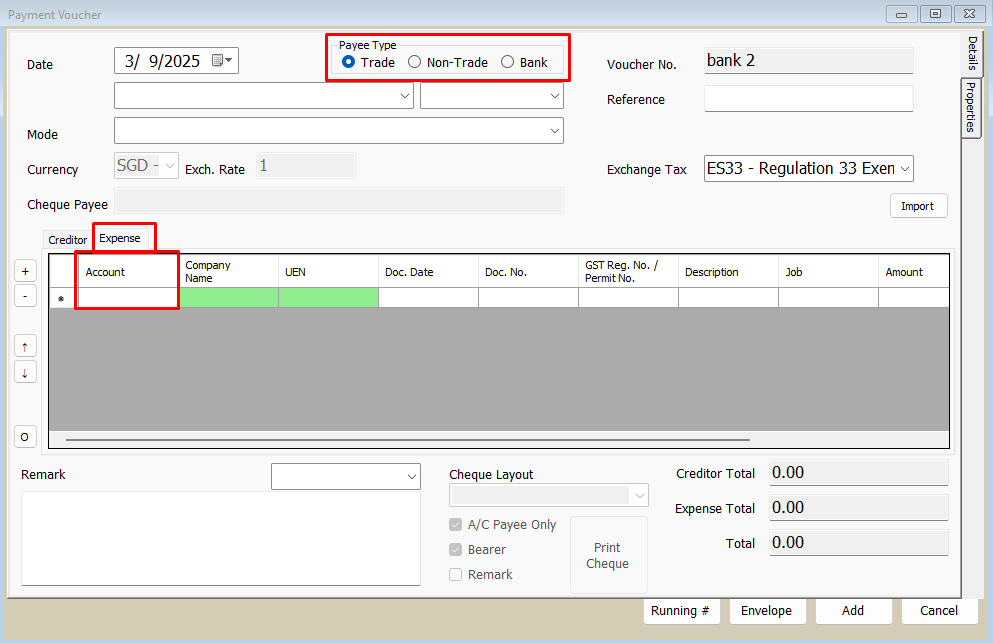
2.NON TRADE PAYMENTS SHOULD ALSO BE TOGGLED TO ''TRADE''.
Should your transaction be of a 'Non-Trade'' nature, please note that your Payee type should still be toggled to 'Trade'.
However, instead of making entries under 'CREDITOR', your entries should be made under 'EXPENSE',
2.NON TRADE PAYMENTS SHOULD ALSO BE TOGGLED TO ''TRADE''.
Should your transaction be of a 'Non-Trade'' nature, please note that your Payee type should still be toggled to 'Trade'.
However, instead of making entries under 'CREDITOR', your entries should be made under 'EXPENSE',
3. It is also important to note that all transactions MUST have a ''REFERENCE'
As some banks require for this field to be filled up before they process and allow the entries.
As some banks require for this field to be filled up before they process and allow the entries.
Payment Records
STEPS:
- Click on 'PAYMENT RECORDS' > 'IMPORT'
- Select the Date Range of records you wish to process.
(You may filter or sort the records by: Payee Name, Voucher Number, Reference, Payment Mode.) - Tick all records that you wish to process.
- Click on 'IMPORT' at the bottom of the page.
- Records should be processed and imported.
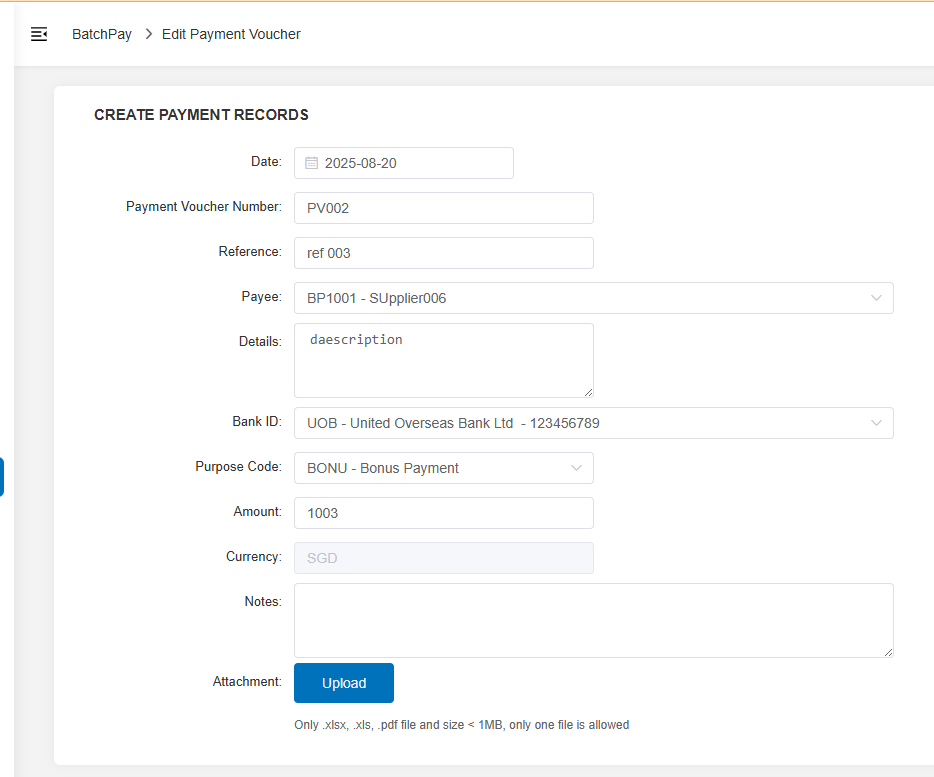
Find the newly imported records - You may do so by filtering or sorting according to the new records details. - Click on 'EDIT'.
While most details should already be pre-filled, ensure that all of the below categories are filled in:
Purpose Code: Refers to the resason for the transaction.
Notes: Optional (For you/ your accountant's reference).
Attachment: Optional (For you/ your accountant's reference). - Once filled in, Click on 'SAVE'.
Payment Approvals
STEPS:
- Click on '+' button to create a new batch.
- Fill in the following necessary details:
Bank ID: Select from Dropdown function.
Bank Account Number: Pre-filled.
Bank Account Name: Pre-filled.
Transaction Type: Pre-filled.
Payment Mode Detail: Select according to payment method.
(i.e. as a guide, PAYNOW: Select PAYNOW GIRO, Bank Transfer - Select GIRO NORMAL).
Value Date: The effective date that these transactions would be approved by. (Give buffer time.)
Bank Format: Usually SWIFT/BIC Code.
Batch No.: Internal Identifier (e.g. MM/YYYY GIRO)
On Behalf of: Internal Reference (e.g. Company Name)
Your Reference No.: Internal Reference (e.g. Expenses) - Select 'CREATE'.
- Click on 'LOAD'.
(You may filter or sort records by Date, Status, Payee Name, Voucher, Reference.) - Select the records that you wish to submit for BatchPay.
- Click on 'NEXT'.
The Batch ID will be shown with the relevant records you have selected below.
On the far right of the table, there is an 'ACTIONS' column with 4 symbols.
For each record, you may choose to:
a. VIEW voucher in greater detail (EYE Symbol)
b. APPROVE of voucher (TICK symbol)
c. REJECT voucher (CROSSED OUT symbol)
d. RELOAD voucher (REFRESH symbol) - Upon selecting a deciding action - APPROVE/REJECT, you may click on 'SAVE' located at the bottom of the page.
Importing Records
It is crucial to note that records that have been imported into BATCHPAY, are NOT linked to the SAM system anymore.
Changes to the entries (e.g. voucher value, reference), will NOT be reflected in the SAM system.
Changes to the entries (e.g. voucher value, reference), will NOT be reflected in the SAM system.
Related Articles
Accounting GST Training Guide
Training PDF can be downloaded from 'Attachment' section below.Accounting Inventory Training Guide
Training PDF can be downloaded from 'Attachment' section below.Accounting Basic Training Guide
Training PDF can be downloaded from 'Attachment' section below.Accounting Advance Training Guide (SAM)
Training PDF can be downloaded from 'Attachment' section below.CIMS User Guide
User Guide Construction Inventory Management System User Guide Link to portal https://espirit.ocisystem.com/